On this page
- What Incident Investigation Evidence Is
- Why Good Evidence Changes the Outcome
- Who Collects the Evidence
- The Evidence Collection Sequence at a Glance
- Secure the Scene and Know When It's Released
- People: Early Accounts Before Memories Blend
- Position: Photographs, Video and Drones
- Sketching and Measuring the Scene
- Parts: Securing Equipment, Tools and Materials
- Recording the Conditions: Weather, Lighting and Noise
- Paper: Documents and Records
- Electronic Data and How Fast It Disappears
- Chain of Custody and the Evidence Log
- When OHS Officers, Police or a Coroner Arrive
- Privacy, Legal Privilege and Who Sees the Evidence
- Storing, Retaining and Releasing Evidence
- Using Evidence to Test Causes, Not Confirm a Hunch
- A Practical Workplace Example
- Common Mistakes to Avoid
- What an Auditor Expects to See
- The Bottom Line
- Download the Evidence Log and Scene Checklist
- Frequently Asked Questions
- Related Guides and Articles
- How Calgary Safety Consultants Can Help
- Sources
What Incident Investigation Evidence Is
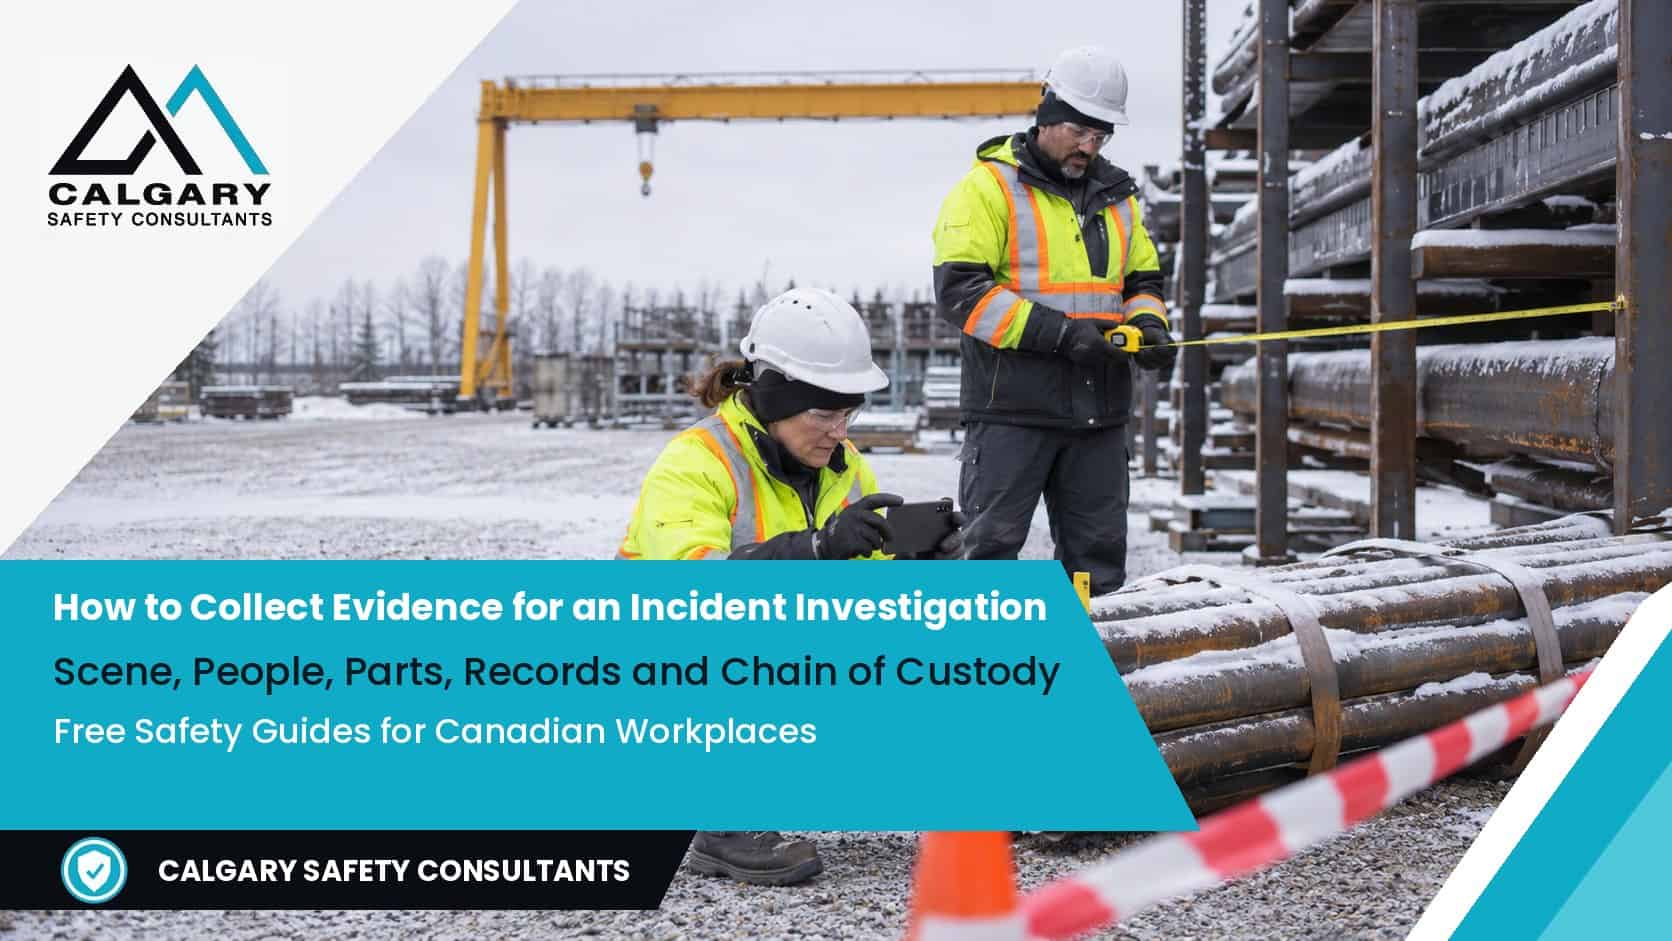
When something goes wrong at work, everyone has a version of what happened. The operator remembers it one way, the spotter another, and the supervisor who arrived five minutes later has a theory before the dust settles. Evidence is what lets an investigation sort out those versions: the physical, recorded and first-hand information that shows what the conditions were, what people did and what the equipment was doing when things went wrong.
A simple way to remember the kinds of evidence is the four Ps:
- People: the injured worker, witnesses, the crew, first aiders and anyone who knows how the job is normally done.
- Position: where people, equipment, materials and debris were, captured in photographs, video, sketches and measurements.
- Parts: the physical items involved, such as a failed sling, a ladder, a missing guard, the worker's PPE or a sample of a spilled product.
- Paper and data: hazard assessments, FLHAs, permits, training and maintenance records, schedules, and data from cameras, vehicles, equipment and access systems.
Our guide on how to respond to a workplace incident covers the first hour, when the job is to hold the scene and grab the obvious. Our guide on how to investigate a workplace incident covers the whole investigation, from interviews to causes. This guide sits between them: how to collect evidence properly, in what order, and how to keep it intact from the moment it's found to the day it's released.
Why Good Evidence Changes the Outcome
An investigation is only as good as the facts it starts with. If the photos were taken after the area was tidied, the witnesses talked it over in the lunchroom and the damaged part went back to the supplier, the investigation is left guessing. Guesses tend to land on the easiest answer, usually that the worker wasn't careful enough, and that rarely prevents the next incident.
A study of eight accident investigation manuals found that what investigators look for largely decides what they find, because the model behind a method steers which evidence gets collected and which causes get named (Lundberg, Rollenhagen and Hollnagel, 2009). Collecting broadly, before anyone settles on a cause, is the best protection against that trap.
Good evidence also supports your due diligence if an OHS officer issues orders, helps the workers' compensation board decide a claim fairly, gives your insurer what it needs and shows an auditor that investigations rest on facts. Energy Safety Canada's 2023 COR audit protocol, for example, expects written incident reporting requirements to include protecting evidence as legislation requires.
Who Collects the Evidence
Evidence collection usually starts with the supervisor or person in charge and passes to whoever leads the investigation. Several jurisdictions expect the joint health and safety committee or representative to take part in investigating serious incidents. In Saskatchewan, where there's a committee, its co-chairs or their designates investigate accidents causing a death or an in-patient hospital stay of 24 hours or more, under section 3-18 of the regulations.
Name the roles before anything happens: one custodian who keeps the evidence log, one photographer, someone to sketch and measure, and someone to gather documents and send data requests. In a small business one person may do it all, which works as long as they follow a sensible order and write everything down. Whoever does it should be trained; our incident and emergency management training covers it. Bring in specialists, such as an engineer, electrician, occupational hygienist or data technician, where the evidence needs them. Your job is to protect it until they arrive, not to take it apart.
The Evidence Collection Sequence at a Glance
Evidence doesn't all disappear at the same speed, so collect it in order of how perishable it is. A footprint in fresh snow, a valve handle's position or a witness's untouched memory can be gone within minutes or hours. Camera footage and data logs last until the system records over them. Training and maintenance files will still be there next month.
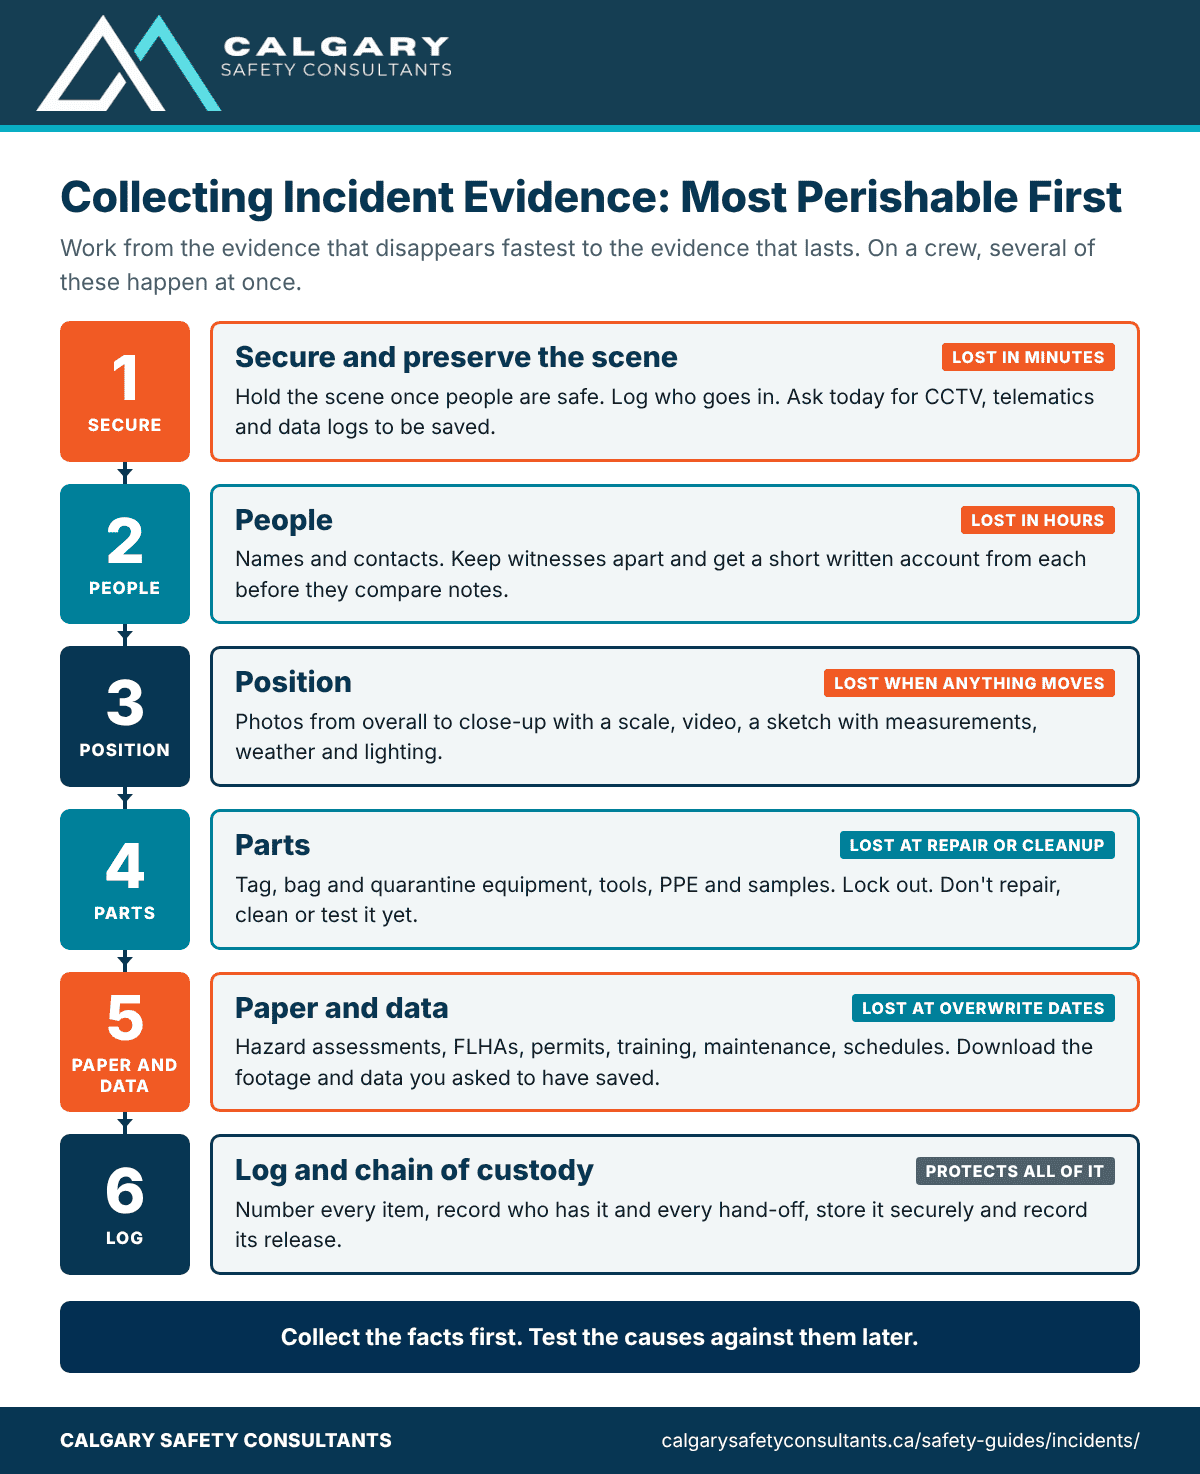
Electronic data comes late in the sequence because you'll usually download and review it later, but the request to save it belongs in the first hour. A camera system that overwrites itself every few days won't wait for the investigation to reach step five.
| Evidence | Examples | How fast it can be lost | How to keep it |
|---|---|---|---|
| People | Witness and injured worker accounts, the crew's knowledge of the normal method | Hours: memories fade and blend once people talk | Separate witnesses, take short written accounts early |
| Position | Where people, equipment, controls and debris were; weather, lighting, ground | Minutes to hours: rescue, weather and cleanup change it | Photograph, video, sketch and measure before anything moves |
| Parts | Failed components, tools, ladders, PPE, guards, locks and tags, samples | Hours to days: repaired, discarded or returned | Tag, bag, lock out and quarantine; no repairs or testing yet |
| Paper | Hazard assessments, FLHAs, permits, procedures, training, maintenance, schedules | Days to weeks: back-filled, misplaced or updated | Copy them as they were on the day and note who provided them |
| Data | CCTV, telematics and GPS, phone and radio logs, equipment controllers, access logs | Hours to weeks: overwritten on a fixed cycle | Send hold requests on day one; record how each download was made |
Secure the Scene and Know When It's Released
Once people are cared for and the hazard is controlled, widen the barricade beyond what looks necessary; it's easier to shrink a scene than to recover evidence someone walked through. Post a person at the edge with a scene entry log recording who goes in, when and why. That log is the start of your chain of custody.
For incidents that must be reported to the regulator, the law decides how long the scene stays untouched. The common pattern is that nobody disturbs it except to attend to the injured or killed, prevent further harm or, in most places, protect endangered property, until the regulator releases it or directs otherwise. The details differ:
- Alberta: section 33(9) of the OHS Act covers the immediate area and related equipment, documents and information, unless a Director, OHS officer or police officer directs otherwise.
- British Columbia: section 68(2) of the Workers Compensation Act applies unless an officer of the Board or a peace officer directs otherwise.
- Saskatchewan, the Northwest Territories and Nunavut: the strictest rule covers accidents causing a death. Under section 3-19 of the OHS Regulations, 2020 and section 29 of the Northwest Territories and Nunavut OHS Regulations, an officer can let work proceed before the investigation is complete only once photographs or other evidence of the scene have been made and the committee or representative (in the territories, where one is available) has inspected the site and agreed.
- Manitoba: the province's serious incident guidance says the scene stays undisturbed until Workplace Safety and Health releases it, and may have to be kept intact for at least 24 hours after notification.
- Ontario: section 51(2) of the OHS Act protects the scene of a death or critical injury until an inspector permits otherwise.
- New Brunswick and Nova Scotia: section 43(3) of New Brunswick's OHS Act and section 64 of Nova Scotia's OHS Act apply unless an officer directs otherwise.
- Yukon: the board's serious incidents bulletin includes related equipment, documents and information, unless the board or the RCMP direct otherwise.
- Federal: section 127 of the Canada Labour Code requires the Head's authorization after an employee is killed or seriously injured, with exceptions for aircraft, vessel, rail and pipeline incidents investigated under other federal transport laws and for motor vehicle incidents on a public highway.
Our guide to reporting workplace incidents across Canada explains which incidents trigger these rules, and our OHS legislation guide links to every jurisdiction's laws. Remember that the exceptions are about people and safety, not convenience, and write the release down: who released the scene, when and on what conditions. Photograph the scene again just before anything moves.
Non-reportable incidents have no legal hold, but the evidence is just as fragile. Set your own rule, such as holding the scene until the supervisor has photographed and sketched it, and build it into your emergency response plan and internal incident reporting procedure.
People: Early Accounts Before Memories Blend
Witness memory is the most fragile evidence there is. Part of the problem is forgetting, but the bigger risk is contamination: people talk, compare notes and settle on a shared story, and each comes away sincerely believing they saw parts of it themselves. In a study where pairs of witnesses saw slightly different versions of the same event, 71% of those who discussed it went on to report details they had only heard from the other person (Gabbert, Memon and Allan, 2003). On a work site, that's the crew around the tailgate, with the most confident voice shaping everyone's memory.
So the aim in the first hour isn't an in-depth interview; it's protecting what people remember. Get every witness's name, employer and phone number, including drivers, contractors and members of the public who may leave. Keep witnesses apart where you reasonably can and ask them, kindly, not to discuss it until they've given their account. Then have each one write a short account in their own words of what they saw, heard and did and where they were standing, sticking to what they saw themselves.
That early account works. A structured self-administered interview completed soon after an event produced more correct details than free recall, and people who had completed one recalled more correct details a week later (Gabbert, Hope and Fisher, 2009). A one-page account form with open prompts, kept in the first aid kit or truck, does much the same job. Look after people while you do this, since someone in shock needs care before questions. The in-depth interviews come later, as the investigation guide explains, and our guide on how to write a workplace incident report shows how to summarize accounts without rewriting them.
Position: Photographs, Video and Drones
Position evidence answers the first question every investigator asks: where was everything? It's lost the moment a rescuer moves a ladder or a co-worker switches a control back to "off". The UK Health and Safety Executive's Investigating Accidents and Incidents (HSG245) stresses capturing information as soon as possible, before items are moved or guards put back, including sketches, measurements, photographs and environmental conditions.
Photographing the Scene
Photograph before you touch anything, and take more than you think you need. Work from the outside in, so a stranger could follow the story: overall shots of the whole area and how you'd get to it, mid-range shots showing how the key items relate, then close-ups of the fracture surface, the switch position, the missing pin or the gauge reading.
- Use a scale. Take each close-up twice, once as found and once with a ruler or scale card beside it.
- Show orientation. Shoot the overall views from all four sides and note the direction you faced.
- Keep timestamps honest. Check the camera's date and time first, and never edit the originals; work on copies.
- Keep a photo log of each number, what it shows, where you stood and the time.
- Use video for a narrated walk-through, or for movement and sound once it's safe and the investigator agrees.
- Photograph what isn't there: the empty guard bracket, the bare lockout hasp, the blank line on the permit.
Drones and Aerial Images
For a large outdoor scene, such as a collision on a lease road or a crane incident, an overhead image shows distances far better than ground photos. Drones are regulated by Transport Canada, whose drone category rules require a pilot certificate for any drone of 250 grams or more, flight within visual line of sight for most operations, and no flying over people in basic operations. Use a certified pilot, stay clear of responders, and get the regulator's or police's agreement first if they control the scene.
Sketching and Measuring the Scene
Photographs show what a scene looks like; a sketch shows where things are. Even a rough sketch with good measurements answers questions no photo can, such as how far a worker fell or whether a load could have reached the spot a witness says they stood.
On a grid sheet, draw the outline of the area, mark north and add fixed points that will still be there next year, such as a building corner, column or survey pin. Measure each important item from two fixed points so anyone can rebuild the scene later, and record heights for falls and falling objects. Number items to match the photo and evidence logs, add a legend, and note who measured and with what. For complex scenes, a surveyor or laser scanner captures far more detail, but an early sketch still shows the scene before anything moved.
Parts: Securing Equipment, Tools and Materials
Physical evidence gets lost for the best of reasons. A mechanic wants the machine running, a crew lead throws a cracked ladder in the bin so nobody else uses it, or the supplier offers a warranty swap. Each destroys the thing that could show why it failed.
Once the scene has been recorded, and released if the incident was reportable, tag each item with a number that matches the evidence log, the date, where it was found and who collected it. Bag small items in clean, sealed containers and lock larger ones in a cage or room with limited access. Keep broken pieces together without fitting them back, which can damage the surfaces an expert needs. Keep the worker's PPE, even if it looks undamaged.
Equipment that stays in place should be locked out and tagged out of service with an evidence tag added. Don't repair, clean, test, reset its controller or run it to "see what happens" until the investigator decides how it will be examined; plan any test with the specialist and record it. Collect samples of spills or exposures only if you're trained and it's safe, in clean, labelled containers, and keep the product's safety data sheet.

Recording the Conditions: Weather, Lighting and Noise
Conditions are often part of the cause, and they change fastest of all. Record temperature, wind, precipitation, ice, ground conditions, light and glare, noise that could have drowned out a horn or shout, and dust, fumes or steam that could have blocked a view. In a Canadian November, many incidents happen in darkness or half-light at shift change. Check your notes later against Environment and Climate Change Canada's hourly historical weather data and the National Research Council's sunrise and sunset calculator, which gives sunrise and sunset times for any place and date (civil twilight is in its full-year table), and save both to the file.
Paper: Documents and Records
Documents show what was planned, how people were trained and how equipment was maintained, and comparing them with what actually happened is often where the underlying causes appear. The investigation guide lists the records to gather; the evidence skill is in how you collect them.
Get documents as they were at the time. Collect the original FLHA, permit, pre-use inspection and sign-in sheet from the day, and copy the hazard assessment, procedure, training and competency records, maintenance history, manufacturer's instructions, schedules, hours worked and earlier incidents on the same task. Log who gave you each one and when. Watch for forms that turn up "completed" afterwards. A back-filled FLHA is worse than useless, and in Alberta and Yukon, and after a fatality in Saskatchewan, the Northwest Territories and Nunavut, where related documents are part of the protected scene, it's a problem in its own right. The honest record is the blank form plus a note of when it was found. Our supervisor due diligence guide explains why records made at the time carry far more weight.
Electronic Data and How Fast It Disappears
Much of the best evidence is electronic, and almost all of it is on a timer. Camera systems overwrite on a set cycle, often within days. Telematics and GPS platforms keep detail for a limited period. Equipment controllers may hold only recent fault codes and clear them on restart. Radio and dispatch logs, gas detector logs, alarm panels and access systems keep their own records, often held by a vendor or another company.
So list every system that might have captured the incident or the hours before it, and ask each owner in writing, on day one, to save the relevant period. Record who you asked, when, the period and the date the data would otherwise be overwritten. Some legal retention periods help, such as the six months motor carriers must keep records of duty status and supporting documents under section 85(3)(b) of the federal Commercial Vehicle Drivers Hours of Service Regulations, but don't rely on them for the detailed data you need.
When you download data, record how, by whom, from which device and with what software, and keep the original export untouched. A worker's personal phone is theirs; if its records matter, that's a question for the regulator, police or your legal adviser. The standard ISO/IEC 27037:2012 gives guidelines for collecting and preserving digital evidence, and it's worth sharing with your IT team or data vendor now.
Chain of Custody and the Evidence Log
Chain of custody is a record of everywhere an item of evidence has been and everyone who has had it, from discovery to release. It answers the question a lawyer, insurer or officer will eventually ask: how do you know this is the same part, and that nobody changed it?
The evidence log is its backbone. Give every item a unique number, including photographs, video files, documents and downloads. Record what it is, where and when it was found, who collected it, how it's stored, and every transfer: who handed it over, who received it, when, why and in what condition. Labs, engineers and officers sign for what they take. Most of it is discipline: one custodian, locked storage, sealed containers that show if they've been opened, and a log filled in as things happen. The free form with this guide is built for exactly that.
When OHS Officers, Police or a Coroner Arrive
After a serious incident, you won't be the only one collecting evidence. OHS officers, police and, after a death, a coroner or medical examiner each have legal powers, and cooperating fully is part of your duty.
OHS officers can generally take photographs, measurements and samples, require records and copy or remove them, and in many jurisdictions seize items. In Alberta, sections 34 and 36 of the OHS Act let an officer do all of these, including seizing or sampling items to find the cause, with a receipt. Ontario's guide to the OHS Act explains that inspectors may take photographs and samples and remove documents for copying. New Brunswick's section 28(1) and Nova Scotia's section 47 let officers take photographs and samples and remove records to copy them, section 141(1) of the Canada Labour Code lets the Head take samples, photographs and sketches and, where there's no reasonable alternative, remove equipment for testing, B.C.'s Act gives limited authority to seize evidence without a warrant in section 81, and Saskatchewan's investigation guidance says officers with a warrant can seize anything that may be evidence.
In practice, don't remove, test or tidy anything without the officer's agreement, give them copies of what you've collected, ask for copies or a receipt for what they take, and record each item on your log as a custody transfer. Your own investigation usually continues alongside theirs. Police take charge where there may be a crime, and a coroner or medical examiner has authority after a death; follow their directions and ask how they want witness contact handled.
Privacy, Legal Privilege and Who Sees the Evidence
Incident evidence often holds personal information: medical details, footage of bystanders, witness accounts. Collect what the investigation needs and no more. WorkSafeBC's guidance on conducting an employer investigation says to record only personal information relevant to the investigation, and the Privacy Commissioner of Canada's video surveillance guidelines say recordings should be kept only as long as needed, with access limited to a few authorized people. Keep medical information separate from the rest of the file.
Legal privilege is a separate question. In general terms, solicitor-client privilege protects confidential communications made to get legal advice, and litigation privilege protects material made for the dominant purpose of litigation and ends with it, as the Supreme Court of Canada explained in Blank v. Canada (summarized by the Office of the Privacy Commissioner). Privilege doesn't let you withhold facts or the reports OHS law requires. Where charges, a lawsuit or an inquiry are possible, get legal advice early.
Storing, Retaining and Releasing Evidence
Store physical items somewhere locked and dry, with the custodian holding the key, and digital evidence in a restricted, backed-up folder with originals kept apart from working copies. Alberta's OHS Act, section 33(7), requires investigation reports to be kept for at least two years, and Yukon's bulletin gives the same period, but evidence from a serious incident may need to be kept until any appeal, prosecution, civil claim or inquiry is over. Set a retention rule, and check with your legal adviser before destroying anything from a serious incident. When evidence is released for repair, return or disposal, record who authorized it, and inspect repaired equipment before reuse, tracking the repair through your corrective action process.
Using Evidence to Test Causes, Not Confirm a Hunch
The danger with evidence is deciding the answer first and collecting what fits. The HSE guide's advice is to keep an open mind and consider everything that might have contributed, which is harder than it sounds when the obvious story is standing in front of you.
Treat each possible cause as a question the evidence must answer. Write it down with what would have to be true if it were the cause: if the sling was overloaded, the load weight, rigging plan and sling tag should show it. Check each against the evidence, and track the facts that don't fit, because that's usually where the real answer is. Build a timeline from photos, data timestamps, accounts and records. Two witnesses who disagree aren't settled by believing the senior one; test their accounts against the camera, the controller log or the marks on the ground. Then take the facts into a root cause analysis. A separate guide on how to follow up after a workplace incident is coming soon.
Workplace example
A Practical Workplace Example
Situation: Consider an illustrative steel fabrication shop in Saskatchewan with about 40 workers. Late on a November afternoon, a bundle of steel tubing slips from a choker sling during an overhead crane lift in the yard and lands about a metre from a labourer. Nobody is hurt. The supervisor calls the ministry to check whether it's a reportable dangerous occurrence and treats it as a full investigation either way.
Action: He stops the crane, tapes off the yard and posts a worker at the gate with an entry log. Before dark he photographs the bundle, sling and crane from four sides, takes close-ups of the sling eye with a tape beside it, and sketches the yard, measuring from the shop corner and a light standard. The operator, rigger and labourer each write a short account separately. The safety coordinator emails the building owner that afternoon to save the yard camera footage and has the crane's service technician download the load data before anyone resets it. The sling is tagged as item 7 and locked in the tool crib cage, and the crane is locked out with an evidence tag.
Result: The footage, saved two days before it would have been overwritten, showed the bundle tilting as it cleared the rack, and the crane data ruled out an overload. The photographs and the rigger's account showed a choker hitch set high on an unblocked bundle. The investigation found the rigging plan didn't cover tubing bundles and the rigger hadn't been assessed on that hitch. The shop wrote a tubing lift plan and retrained its riggers, and its evidence log showed exactly how each finding was supported.
Common Mistakes to Avoid
- Cleaning up for appearances. It destroys evidence and may break the law.
- Letting witnesses talk it over first. Their memories blend for good.
- Waiting to request footage and data. By then it's been overwritten.
- Repairing or testing equipment before it's examined. The quick fix removes the proof.
- Photos with no log, scale or orientation. Unlabelled pictures are almost as bad as none.
- Measuring from things that move. Use fixed points so the scene can be rebuilt.
- Completing paperwork after the incident. A blank form with an honest note is evidence; a back-filled one is a problem.
- No custodian and no chain of custody. If you can't show where an item has been, its value drops.
- Collecting personal information you don't need. More isn't better with medical details or bystander footage.
- Collecting only what fits the first theory. The facts that don't fit matter most.
Audit perspective
What an Auditor Expects to See
Energy Safety Canada's 2023 protocol looks for written requirements that include protecting evidence as legislation requires, starting investigations immediately, involving a worker competent in the task, identifying contributing and underlying factors, training for investigators and senior management review of reports. In the files, an auditor wants reports backed by real evidence, such as photographs, sketches, witness accounts and copies of records, not just a narrative and a conclusion. In interviews, supervisors should be able to explain how they'd protect a scene and what they'd collect. A consistently used evidence log is one of the clearest ways to show it.
Calgary Safety Consultants helps employers build and test their programs and prepare for COR and SECOR audits; we don't issue certificates. CORs and SECORs are issued through the applicable certifying partner.
The Bottom Line
Collecting incident investigation evidence well comes down to order and discipline. Protect the scene, capture what people remember before it blends, record where everything was, secure the physical items, gather documents as they were and ask for data before it's overwritten. Then log every item and every hand-off. None of it needs special equipment, just a camera, a tape, a grid sheet, bags, tags and a form. Put a kit together now, name who does what, and practise on your next near miss.
Download the Evidence Log and Scene Checklist
Two free, fillable PDF downloads go with this guide. Both have clickable checkboxes and fill-in fields, so you can complete them on screen or print them for your investigation kit.
- Incident Evidence Log and Chain of Custody Form (PDF, 7 pages). A working record for the investigation file: how to use it, incident and custodian details, a numbered evidence register for every item, a photo and video log, physical item tags with custody transfer records, a document and data request tracker with overwrite and retention deadlines, an officer and agency log, storage checks, release and disposal records, and sign-off.
- Scene Evidence Checklist and Sketch Sheet (PDF, 7 pages). A kit for the scene: how to use it, incident details, an evidence kit checklist and scene roles, a scene security checklist and entry log, checklists for people, position, parts, and paper and data, a photo shot list, environmental conditions, items tagged at the scene, a witness contact list with early account tracking, a grid sketch page with a north arrow and legend, and a measurement table from fixed points with hand-off and review.
Click either button to download the file. Keep printed copies in your first aid kit, investigation kit or vehicle, and adapt both to your program and the rules that apply in your province or territory, or under the Canada Labour Code.

About the author
John Duplessis, B.Sc., CRSP
John Duplessis is a Canadian Registered Safety Professional with more than 30 years of occupational health and safety experience in oil and gas, construction, green energy, midstream operations and industrial project work. He is an external auditor with Energy Safety Canada.